My Husband and I decided we couldn't take another day of the 10 yr old carpet in our RV. Considering winter was arriving and we were planning our next trip in Feb 2009, we would get the job done now. We got started on Nov 19, 2008.
First: Ripping out the old carpet and Vinyl flooring.
Tools used: Pliers, do all, utility knife, level and muscle. Do not forget the knee pad.

 The only way to hold the carpet down where the slide started was to instal the same steel braket that we had removed in the beginning. So off to Home Depot to find it. When there we found exactly what we needed and also the solution to the entrance stairs. (You will see it a bit later) We thought if we left the underlay of the carpet there it would cause it to be to high for the slide to work properly, so more cutting away.
 To save yourself a head ache later, remember to mark the messurement for the bolts holes of each chair that you have removed and predrill them.
 I should mention that around objects such as the dog house we used exterior double sided tape to hold the flooring down. (Also found at Home depot, in the paint section.)
  Double sided tape works great here.

 Looking good!!
 The sales clerk at Home Depot advised us to put Kitchen and bath silicon caulking around the outer perimeter so that is something spilled or water came in somehow it wouldn't be able to get under the flooring

 Coming along just fine

 Cutting around the cuboards and such was quite a pain and time consuming.
 Once the front was all caulked we put the three seats back in to get them out of the way.
 Looking GOOD!!
 Sorry that I didn't take any photos of the booth when it was all removed. Three sheets of the flooring fit perfectly in the opening between the two booths so it went very smoothly. We left the carpet under them just because we didn't want to deal with the way it would affect the slide.
 You can see here in the next few photos that the transition strip worked out perfectly with no interruption with the slide.


 Now to continue through the bathroom and into the bedroom.

 Tite quarters around the bed.
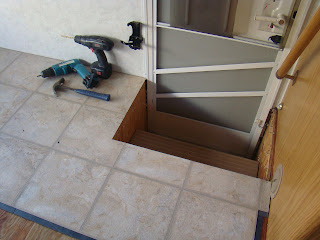
 Now the last piece to finish....

 Tadaaa!!!!
  I forgot the stairs still need to be done.

 We bought this trim for the stairs and the driver side entrance to protect the floor and give it a finished look.


First: Ripping out the old carpet and Vinyl flooring.
Tools used: Pliers, do all, utility knife, level and muscle. Do not forget the knee pad.

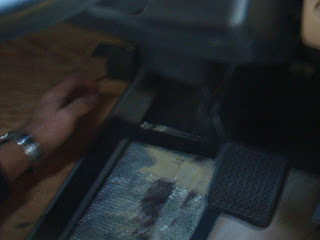
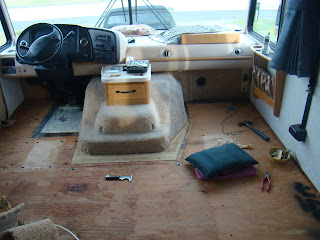
This steel stuff is hard to lift. It is screwed into the subfloor through the carpet.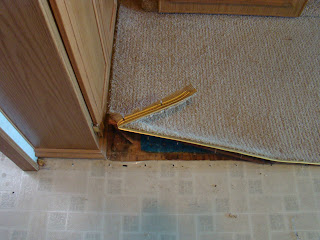 Be careful for the wooden strip with lots of nails to hold the carpet in place. It is a tough one to handle. Shoot there is under lay here that needs to come up too.
  What to do about the Kitchen booths?
 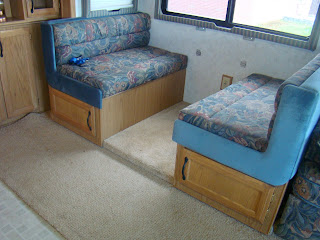 You would not believe the dirt and sand that we found under the carpet, even though we had shop-vacked the whole thing.
  What about the slide? We decided to leave the carpet under the slide because we have no way to take the slide out and put it back.
  The dog house was a big dilemma. After great debate we decided to do nothing to it for lack of good ideas.
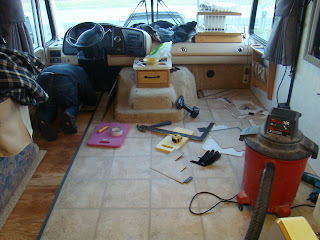
 It took a whole afternoon to remove the three chairs but made the job much easier in the end.
  You will be in staple hell for a long while.
 There is a lot of uneven floor around this area. We chose to ignore it.
 Removed all the Vinyl flooring in the kitchen and bathroom. Tight quarters!
 Like i said before, staple hell.


 Vacuuming is a constant.
 We had believed that we would put interlocking laminate flooring down because we had done our basement with it a few years earlier and had no problems. Off to Home Depot to check it out. The sales man was very informative and said that with the changes in temperature and the constant shifting and such would not make for a good place for Laminate flooring. He suggested Allure interlocking resilient flooring because of its ability to float. All we had to do is warm the trailer up for the installation so that the glue could lock the tiles together. Once installed no worries.
 This flooring was so easy to work with. We made sure we started with a straight line and started placeing the tile strips down.
 The dog house was a catch again but we descided to just go right over the uneven floor and cut the tiles out to fit around it.
We decided that it would go a lot easier if we took the booths out and we were glad that we did because there was dirt trapped there for who knows how long.
Be careful for the wooden strip with lots of nails to hold the carpet in place. It is a tough one to handle. Shoot there is under lay here that needs to come up too. What to do about the Kitchen booths?  You would not believe the dirt and sand that we found under the carpet, even though we had shop-vacked the whole thing. What about the slide? We decided to leave the carpet under the slide because we have no way to take the slide out and put it back. The dog house was a big dilemma. After great debate we decided to do nothing to it for lack of good ideas.It took a whole afternoon to remove the three chairs but made the job much easier in the end. You will be in staple hell for a long while.There is a lot of uneven floor around this area. We chose to ignore it.Removed all the Vinyl flooring in the kitchen and bathroom. Tight quarters!Like i said before, staple hell. Vacuuming is a constant. We had believed that we would put interlocking laminate flooring down because we had done our basement with it a few years earlier and had no problems. Off to Home Depot to check it out. The sales man was very informative and said that with the changes in temperature and the constant shifting and such would not make for a good place for Laminate flooring. He suggested Allure interlocking resilient flooring because of its ability to float. All we had to do is warm the trailer up for the installation so that the glue could lock the tiles together. Once installed no worries.This flooring was so easy to work with. We made sure we started with a straight line and started placeing the tile strips down. The dog house was a catch again but we descided to just go right over the uneven floor and cut the tiles out to fit around it.
We decided that it would go a lot easier if we took the booths out and we were glad that we did because there was dirt trapped there for who knows how long.
The only way to hold the carpet down where the slide started was to instal the same steel braket that we had removed in the beginning. So off to Home Depot to find it. When there we found exactly what we needed and also the solution to the entrance stairs. (You will see it a bit later) We thought if we left the underlay of the carpet there it would cause it to be to high for the slide to work properly, so more cutting away. To save yourself a head ache later, remember to mark the messurement for the bolts holes of each chair that you have removed and predrill them.I should mention that around objects such as the dog house we used exterior double sided tape to hold the flooring down. (Also found at Home depot, in the paint section.) Double sided tape works great here.Looking good!!The sales clerk at Home Depot advised us to put Kitchen and bath silicon caulking around the outer perimeter so that is something spilled or water came in somehow it wouldn't be able to get under the flooringComing along just fine Cutting around the cuboards and such was quite a pain and time consuming.Once the front was all caulked we put the three seats back in to get them out of the way.Looking GOOD!!Sorry that I didn't take any photos of the booth when it was all removed. Three sheets of the flooring fit perfectly in the opening between the two booths so it went very smoothly. We left the carpet under them just because we didn't want to deal with the way it would affect the slide.You can see here in the next few photos that the transition strip worked out perfectly with no interruption with the slide. Now to continue through the bathroom and into the bedroom.Tite quarters around the bed.Now the last piece to finish....I forgot the stairs still need to be done. We bought this trim for the stairs and the driver side entrance to protect the floor and give it a finished look.
11 comments:
hi, why aren't you posting here yet?
Thank you so much for taking the time to write about your experience and posting your photos!
My family was hesitant to tackle this same project until I showed them your wonderful descriptions and photos!
We are almost finished with replacing the carpet with vinyl tile in our motorhome and I wanted to stop in and tell you how much we appreciate your tips. It's because of you that we had the courage to undertake this enormous project ourselves!
Thank You!!!
Lou
Thank you, Thank you, Thank you! I've wanted to do this since we bought our 99 Winnie 2 years ago with identical carpet. I knew it could be done, but my husband (who can fix anything) came up with so many potential issues, I began to doubt my idea. I just showed him this, and we're doing it. In hindsight, is there anything you would do different?
Nice job! And thanks much, as I'm thinking about doing this in our Class A.
We;ve been shopping around to replace dirty carpet and lino in our motorhome,considering Allure which we have in our basement(great so far!)
How is it holding up? Any issue with the adhesive as far as very cold or very hot temperatures in the rv when it's parked, not in use? Couldn't believe when I googled "replacing flooring in rv" and your article up..and didn't even google Allure!!
I'm Glad to hear that i have helped a few people with this awlful challenge and so worth it.
We have done many more things to our class A Motorhome such as:
gutting the closet area and trippled the amount of storage.
adding a folding counter on the kitchen counter to extend it's space.
removed old TV's and added flatscreens with folding arms.
made cuboards into pull out drawers to ease access.
removed old curtain and replaced them with no light blinds, which i absolutely love.
removed both booths and built a long table there which gives us so much more storage.
If anyone wants more info on how to just post or email me.
We are leaving for 6 month oct. 23 for Brownsville ,Texas and will be blogging much more.
Happy Travels!!
I have recently seen that TrafficMaster Allure has come out with a new product that has a click and lock system instead of the adhesive strips that Allure has. It is called TrafficMaster Allure Ultra and is intended to be better for installations that will be exposed to wide tempature swings. Has anyone used Allure Ultra in an RV application? If yes, how is it holding up?
Thank you for showing a step-by-step of this project! I am hoping to redo the carpeting in our 1988 Coachmen.
One question-
How many days (cumulative) did the project take? and how much did it cost?
You are truly brave for undertaking this project!!
This is great info. We have a 5'er and need to replace the carpet. I'd love to replace the linoleum but it is under the cupboards so believe that is a whole lot more work than we're willing to sign up for. Thanks...
Wow, thank-you so much for the pictures and all the info. We have an 83 that we must take up the carpet in. I will refer to your info as I go along. Again Thank-you. Wish us luck.
I want to replace my stained carpet and was glad to see you mention the question of how the slide will affect th e floor. I have been told that slides can ruin a new floor if the rollers are not rubber. How can I check?
Post a Comment